Sunday 30 October 2011

Crane Lamp - Success!

So, when I say I abandoned my origami crane lampshade, I mean I abandoned that design, not the concept as a whole. I was really tempted to scrap the whole idea, and after staring at a pile of little paper birds for two months I was ready to throw in the towel. However... one never outgrows one's parents' philosophies (no matter how hard one might try!) and I learned from my dad that "anything worth doing is worth doing well", and "if you start smething, finish it", so I reluctantly kept working on it. And, hey, I'm glad I did, because it ended up looking like this:


which I like about a million times better than the original idea :)

This is basically a bunch of paper cranes glued to a Pandora lamp that I picked up at B&Q (with this project in mind) in one of their fabulous sales. When I got it home I discovered the reason for the reduced price - a standard lightbulb is taller than the height of the globe! So there was this gap underneath the shade where it doesn't sit flush with the lampbase:


Needless to say, I was pretty unimpressed. Until I discovered that I could slot a crane's tail underneath the shade and it would just sit nicely in the gap like so:


I just put a little dot of UHU glue - the clear liquid stuff, not the sticks - on the tail to hold it in place.

Oh -- it's probably worth mentioning that I put an energy-saving bulb in this lamp, so it never gets real hot. This also means that the bulb should last about 10 years, which is good because the shade's awkward to remove once it's covered in cranes.

Essentially then you just glue a whole bunch more cranes all over the shades at various angles. I found it easiest to work from the bottom up in "rows". Don't make the rows too neat; you want it looking kind of haphazard. About halfway through, mine looked like this:


I found this to be quite a time-consuming project. The glue was great, in that it dried really fast and held everything well. But it was time-consuming to figure out how to place each bird to get the amount of disarray I wanted without it looking like total chaos. In all, including making the birds, it probably took about 4 or 5 hours, but it was totally worth it :)

Saturday 29 October 2011

Origami Crane Lampshade Fail, Crane Mobile Win!

About 10 or 15 years ago, my parents became friends with a Canadian man called Peter. He often came to our house for dinner, games etc., and became like one of the family. We kids called him Uncle Peter.

Uncle Peter folded paper all the time - during long sermons, waiting in the queue at a theme park, sitting on the bus - and my brother picked up his hobby. Matt's now the only 21-year-old male I know whose talents include both gangsta rap and origami! I can't claim to be as advanced in my paper folding techniques as either of these guys, but I do think it's a simple way to create something elegant and beautiful.

Last year I'd made a bunch of cranes to hang on our Christmas tree, and since then they'd just been sitting in a wooden bowl looking colourful but a little useless. Every so often I'd pick them up and rack my brains for something else I could do with them, and eventually came upon the idea of a lightshade. I searched the internet for a tutorial but to no avail, so I decided to come up with my own. It was a bit "trial-and-error" though so bear with me!

What you'll need:

  • a bunch of cranes. If you don't know how to make these, they're very simple and there are a thousand sites that show you how. Put Google to work on this one. I used about 35. 
  • a drum or pendant lampshade frame
  • sewing thread
  • scrapbooking (or other patterned / colourful) paper
  • one or two paper punches in fabric you like
  • a lamp base or pendant light fixture

It's easiest to work on the shade when it's suspended at a comfortable height, so find some way to rig it up. I tied mine to a chair and sat on the floor to work. Thread a length of string through one of the cranes' backs, and tie it onto the top of your lampshade frame so it hangs down to the length you want. Keep attaching the birds in this way until you use them all up or you have as many as you want on the shade.


I hung mine at varying lengths, but later wondered if it might have looked more like a lampshade and less like a child's mobile if I'd hung them all to the same length :| Halfway around it got a bit awkward to reach the side of the frame that was under the chair (plus I got cramp from sitting on the floor so long) so I moved the whole project and hung it from a floor lamp instead. By the time I'd used up all my cranes, it was looking like this:


I had thought that this was all I was going to do, but when I looked at it I felt like there was a lot of empty space between the birds, and I didn't really like the look of the threads hanging down, either. I'd bought some new paper just a few days previously from Paperchase, so I cut out a bunch of circles and little flowers using a punch. (I used about 5 times as many as are in this picture.)


Now, this part was really inefficient. If I'd known at the start that I was going to do this, I would have threaded these all on to the strings when I was hanging the birds. Instead, I glued them on. This did have the advantage of making them double sided - each flower is glued to another flower, and each circle to another circle, with the string going between the two, so the blue pattern shows on both sides - but it was unbelievably fiddly and made me want to pack the whole thing in. To complicate things, I also used a little dragonfly punch to punch out the middle of each circle. Eventually, it started to look like this, which I was much happier with.


Actually by this time I really liked how the project was looking. Unfortunately, I also realised it was essentially a hanging mobile, and wasn't a very practical design for a lampshade.  If we had a nursery I'd have loved to hang it in there, but that's a fair few years away yet, so I have to confess I abandoned the project at this point. However, if you're ever looking for a nice crane mobile design for your mini-me, this might just do the trick :)

Tuesday 4 October 2011

Wardrobe Makeover

Well, I hadn't intended to start this blog with such a big project - I've never refinished a piece of furniture before so it was a bit of an experiment - but I had a couple of things on the go simultaneously and this was the one that got finished first. I wasn't very consistent about photographing the process, so that aspect's a bit choppy; please bear with it!

Mr H and I had accidentally broken a couple legs off my wardrobe when we were moving into our house just over a year ago, and since then it had been propped up somewhat precariously on a stack of books, so when I saw that someone had posted a "small wardrobe" on freecycle I snapped it up. I was a little less excited when I went to the poster's home to pick it up and realised it looked like this:


(Yes, I accidentally took the picture from the back instead of the front because I'm intelligent like that. The point is, it came in two separate pieces and looked pretty battered.) Its redeeming factors were that it had originally been bought in the 1930s, that the owners also threw a beautiful old dining chair into the bargain, and that it had these two carvings in the front. I'm a sucker for pairs or sets of things that don't exactly match, so I was sold on the carvings.


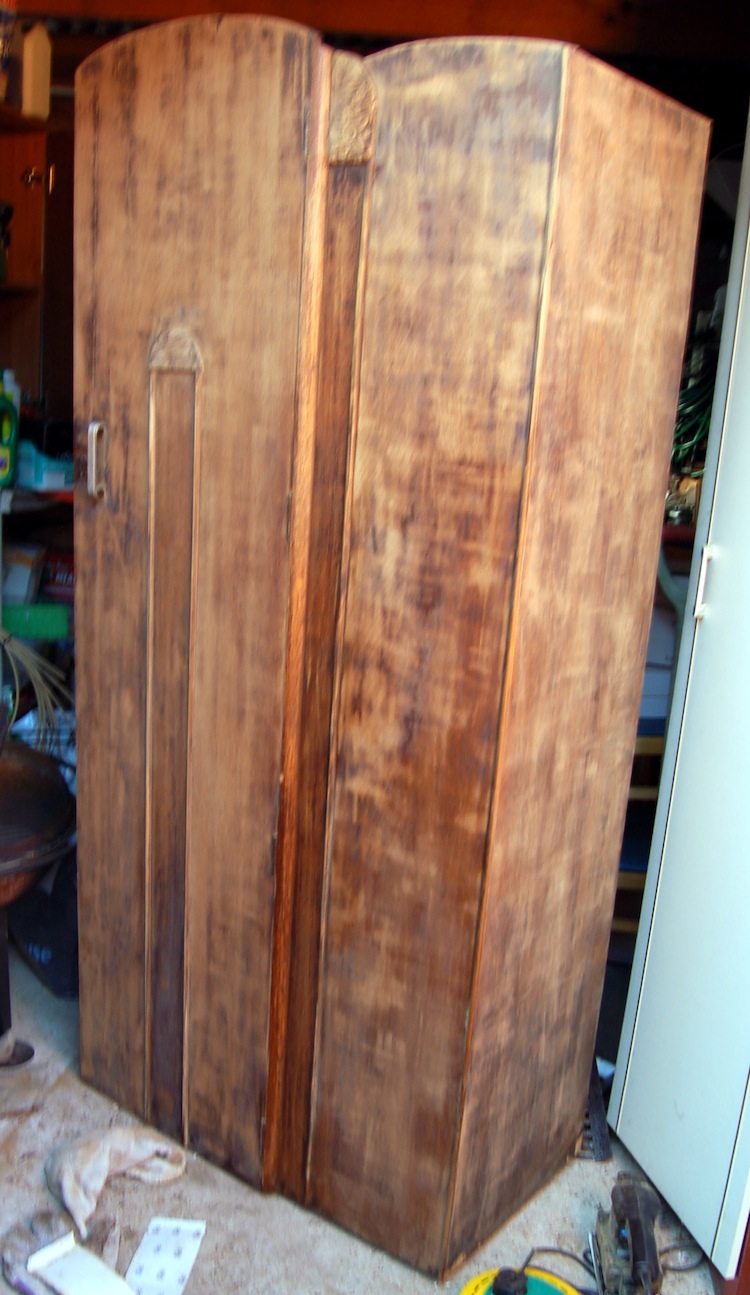
I kept it in two parts the whole time I was working on it, largely because it fit better in the garage like that, then assembled it upstairs once it was completely done. I started by stripping the original finish using Colron Furniture Stripper. As I said, I'd never done anything like this before and didn't realise I'd need about 2 litres of the stuff (Girls, it's not blusher. Less is not more). Between the stripper, a bunch of wire wool, and some elbow grease, we managed to get most of the varnish off. Then I ran my orbital sander over the whole thing to smooth it out. By this point, it looked like this (as you can see, I probably didn't strip it quite as well as I could have; it's still pretty patchy):


Still kind of ugly, no? This process probably took about 4 hours, not including multiple runs to the hardware store to pick up more furniture stripper and wire wool. The point of this project was to keep things low-cost, so I intended to paint it using normal wall paint that I already had lying around. To help it adhere, I did buy some primer, and primed the surface with that before painting. I put the primer on fairly roughly, like this:


Now, you may have noticed in the first picture that there's a mirror on the inside of the door. I suspect this had been on there for a good few decades, as it was in pretty bad shape. I got rid of that, then realised it had been used to cover up how incredibly uneven the inside of the door was. I don't know enough about wardrobe construction to know the reason for this, but it looked as though there were a couple layers of veneer on the door, and various layers had peeled away in big swathes so that there was about a 2mm difference between the thickest and deepest points on the surface of the door. (Sorry, a photo would have described that more clearly, but I didn't have the foresight.) In any case, I filled the door in with wood filler and sanded it down using a fine grain so it would be really smooth.

Once all the primer and wood filler was completely dry, I painted the outside with a tin of light cream gloss that I had leftover from some earlier house-painting project. I painted the inside (without priming it) with matt wall paint in a similar colour.

Now, earlier that week, I'd been smitten by a stencil I'd seen online called 
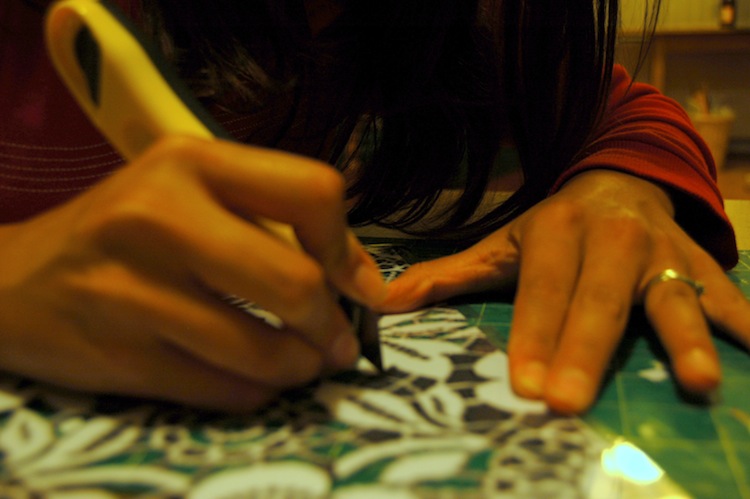
Skylar's Lace. Unfortunately, the Royal Design Studio's prices didn't really feature in my budget for this wardrobe, so I set about making my own. I ran a Google image search for Skylar's Lace, and edited it in photoshop to make the edges of the portion I'd found match up, and to simplify the design a little. I printed this out on A3 paper and laminated it, then used a craft knife to cut it out. This took maybe 2 hours total.


I used repositional adhesive spray and a mini paint roller to stencil this onto the inside of the wardrobe using Dulux paint in Indian Ivy, which is kind of a luminous, lime green. I know nobody sees the inside of your wardrobe except for you, but that's kind of what I like about it. Oh wait, I did take a picture of the whole stencil, but only remembered to do this after I'd used it a couple times so that's why it's a little green. As you can see, I simplified it again when cutting it out and skipped some of the tiny, detailed parts.


My stencilling is far from perfect...

By this point I was definitely starting to be happier about the way the wardrobe was looking, but it still looked kind of "cleaner" than what I was going for. I did a little research online into different distressing techniques, then ran my sander over the whole outside again to "rough up" the paint a little. In some places the sander went right through to expose the wood underneath, and in others it just made the surface of the paint less glossy and smooth. I mixed up a light brown wash using heavily diluted acrylic paint, soaked a cloth in this, and ran it over the surface of the wardrobe. The newly rough surface provided something for the colour to "grab onto" in places, to dirty the whole thing up a little.

This wardrobe is significantly smaller than my previous one, so it then had to sit in the garage for about 3 weeks while I reluctantly purged about a third of my clothes. Mr. H kindly gave up almost a whole Saturday to help me dismantle the old wardrobe, lug this one painfully up the stairs (suddenly Ikea's love affair with MDF makes a whole lot more sense to me. Real wood is heavy!), and assemble it in our room.

Aaand....

This was the final result! It's not perfect, but for a first furniture project, I was pretty happy with it :)