Uncle Peter folded paper all the time - during long sermons, waiting in the queue at a theme park, sitting on the bus - and my brother picked up his hobby. Matt's now the only 21-year-old male I know whose talents include both gangsta rap and origami! I can't claim to be as advanced in my paper folding techniques as either of these guys, but I do think it's a simple way to create something elegant and beautiful.
Last year I'd made a bunch of cranes to hang on our Christmas tree, and since then they'd just been sitting in a wooden bowl looking colourful but a little useless. Every so often I'd pick them up and rack my brains for something else I could do with them, and eventually came upon the idea of a lightshade. I searched the internet for a tutorial but to no avail, so I decided to come up with my own. It was a bit "trial-and-error" though so bear with me!
What you'll need:
- a bunch of cranes. If you don't know how to make these, they're very simple and there are a thousand sites that show you how. Put Google to work on this one. I used about 35.
- a drum or pendant lampshade frame
- sewing thread
- scrapbooking (or other patterned / colourful) paper
- one or two paper punches in fabric you like
- a lamp base or pendant light fixture
It's easiest to work on the shade when it's suspended at a comfortable height, so find some way to rig it up. I tied mine to a chair and sat on the floor to work. Thread a length of string through one of the cranes' backs, and tie it onto the top of your lampshade frame so it hangs down to the length you want. Keep attaching the birds in this way until you use them all up or you have as many as you want on the shade.

I hung mine at varying lengths, but later wondered if it might have looked more like a lampshade and less like a child's mobile if I'd hung them all to the same length :| Halfway around it got a bit awkward to reach the side of the frame that was under the chair (plus I got cramp from sitting on the floor so long) so I moved the whole project and hung it from a floor lamp instead. By the time I'd used up all my cranes, it was looking like this:
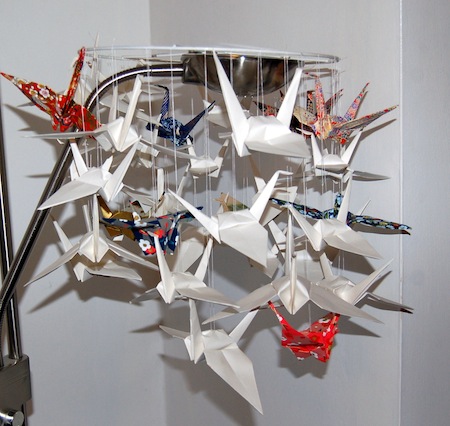

I had thought that this was all I was going to do, but when I looked at it I felt like there was a lot of empty space between the birds, and I didn't really like the look of the threads hanging down, either. I'd bought some new paper just a few days previously from Paperchase, so I cut out a bunch of circles and little flowers using a punch. (I used about 5 times as many as are in this picture.)

Now, this part was really inefficient. If I'd known at the start that I was going to do this, I would have threaded these all on to the strings when I was hanging the birds. Instead, I glued them on. This did have the advantage of making them double sided - each flower is glued to another flower, and each circle to another circle, with the string going between the two, so the blue pattern shows on both sides - but it was unbelievably fiddly and made me want to pack the whole thing in. To complicate things, I also used a little dragonfly punch to punch out the middle of each circle. Eventually, it started to look like this, which I was much happier with.

Actually by this time I really liked how the project was looking. Unfortunately, I also realised it was essentially a hanging mobile, and wasn't a very practical design for a lampshade. If we had a nursery I'd have loved to hang it in there, but that's a fair few years away yet, so I have to confess I abandoned the project at this point. However, if you're ever looking for a nice crane mobile design for your mini-me, this might just do the trick :)
No comments:
Post a Comment